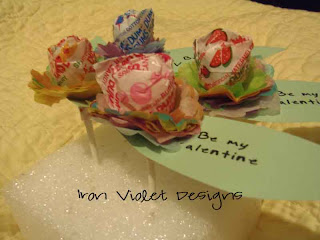
I was thumbing through a scrapbook magazine the other day and came across a this great idea! I practically had everything I needed - well minus the suckers. And I forgot to take a picture of the process, lucky for you it is super easy!! Which was really one of the reasons that I did this.
Supplies you need:
suckers
various colors of tissue paper
scallop circle punch
green cardstock with sentiment printed on it
You take your cardstock and punch out a whole lot of scallop circles. It is best if you do at least 10 sheet at a time. Using less makes it not punch as well, and more just doesn't punch.
After you have like 100 of those scallop circles punch a small hole in the center of them. Again about 10 sheets at a time works great. I used between 10-20 punches for each sucker.
You then insert your sucker stick into the hole and slide the scallop circles up to the bottom of the sucker. I scrunched mine a bit to make it look like a flower. Repeat for something like 50 suckers - really this is just how many me and my kids made. ;)
In a wordprocessing software create a sentiment - 'Be my Valentine'. I used a text box and got about 16 per page. You want to make sure that you can cut a leaf out and have a good sized space on the left side of it to stick the flower and still see the sentiment. Print.
I eyeballed the leaf I wanted and just cut these out. I made Thing #2 cut her own leaves - she was super excited!
In the good sized space you have on the left hand side punch a hole and stick the sucker through it. Now you have a great easy valentine! Oh and have your child sign their name before you stick the leaf on - much easier that way!
Next I have two cards to share with you. My first one is completely copied from Then She Made. I just fell in love with the simpleness and beauty of hers that I had to make one myself. Go to her blog to she her version.
It not that just simple and perfect!?
This one here is for Conan. I saw something like this a couple of years ago, but I cannot remember exactly where. But obviously I liked it if I remembered it still. It was also super easy to make.
First I took my card base - Kraft cardstock - and distressed the edges with a red ink pad.
Then I got a piece of cardstock that looked like paper. I glued that in the top middle.
I printed the words 'You're Hot' because I had no stamps that would work. I stamped the curly label in red and punched out. I distressed the words you're hot so that they would stand out more. At this point I had run out of glue, I wanted to finish so I broke out the kids white school glue. I glued these on.
You should really wait for the glue to dry here, like I did not. You can see the smudge up by you're. I am just not used to using liquid glue.
Anyway, cut a square of plastic from a lunch sack slightly bigger than your paper cardstock. Place over and sew 3 edges with red thread. Do not pull tight as you want to stick a few red hots in there. Add red hots and sew shut. Sew around edges a couple of times until it looks good. Done!
There you have it, super easy last minute valentines!


These are really cute! Filing this idea away for future use!
ReplyDeleteThose are so adorable! I love the flower idea!
ReplyDeleteThanks for sharing in FFA!
Hannah
These are adorable! Thanks for linking up!
ReplyDeleteSO cute! Great job!
ReplyDeleteThanks for linking up to Making It With Allie! I can't wait to see what you have for next week!
AllieMakes.Blogspot.com
What guy wouldn't want to receive a You're Hot card?! Those are all great. Thanks for sharing.
ReplyDeleteThose do look super easy, but turned out so cute!! Thanks for linking to Fancy This Fridays! As always!!! Hope to see you again this week of course! ;)
ReplyDelete